Quick start
Connect once. Map per experience.
Connect credentials once at the workspace level. Each experience then chooses its own destination and sends only the context that campaign needs.
Owner or admin
Workspace owners and admins manage credentials and connection status.
Existing external fields
Create custom CRM or MAP fields before trying to map them in Kulario.
Required contact data
Collect and require the identity fields your selected destination needs.
Marketing consent
External delivery cannot be activated until the experience includes consent copy.
Shared activation flow
- 1
Connect the destination once from the workspace Integrations page.
- 2
Create any custom fields in the external system before mapping them in Kulario.
- 3
In the experience builder, open Capture & activate → Contact gate and collect the identity fields the destination needs.
- 4
Mark required identity fields as Required, add clear Marketing consent text, and optionally add a Privacy policy URL.
- 5
Open Capture & activate → Destinations, choose the connection, and start with Auto-match or Suggest.
- 6
Review the Kulario field → destination field pairs, turn on Send completed responses, and save.
- 7
Publish the experience. Use a consented live completion for the final end-to-end check; test and Demo Lab activity never delivers.
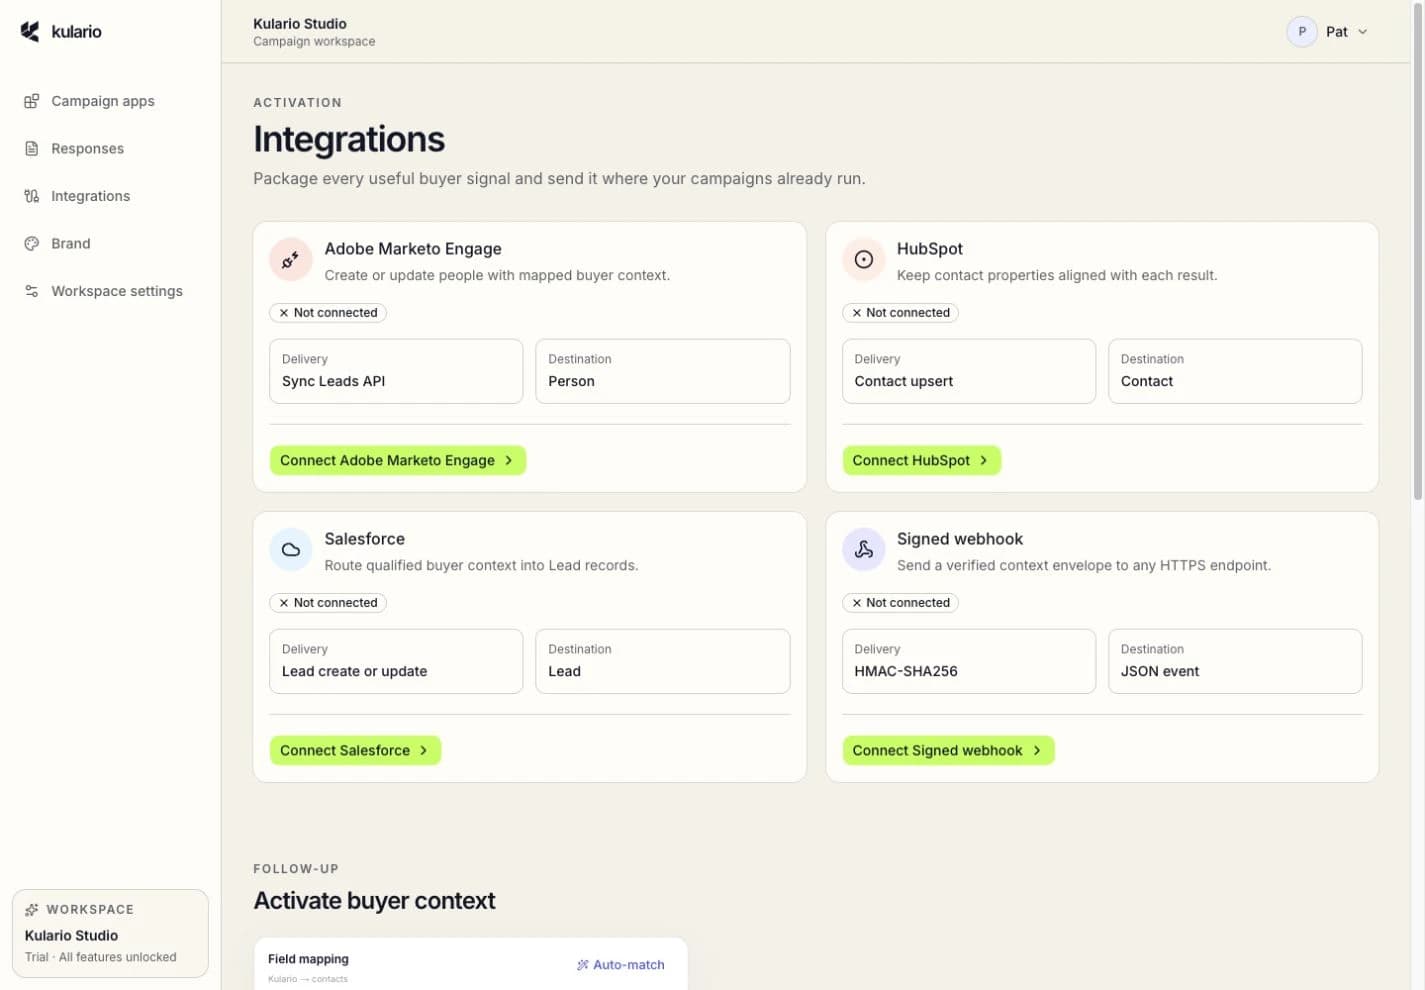
Destination guide
Adobe Marketo Engage
Create or update Marketo people with the buyer's identity, result, declared answers, and recommended next action.
Destination
Person
Identity
Delivery
Mapped fields only
Prepare the destination
- In Marketo Admin, create a dedicated role with Read-Write Lead API access.
- Create an API-only user and assign that role. Give it access to every lead partition Kulario may update.
- Under Admin → Integration → LaunchPoint, create a Custom service for that API-only user.
- Copy the Client ID and Client Secret from the service details.
- Under Admin → Integration → Web Services, copy the REST and Identity endpoints.
Official provider guidance
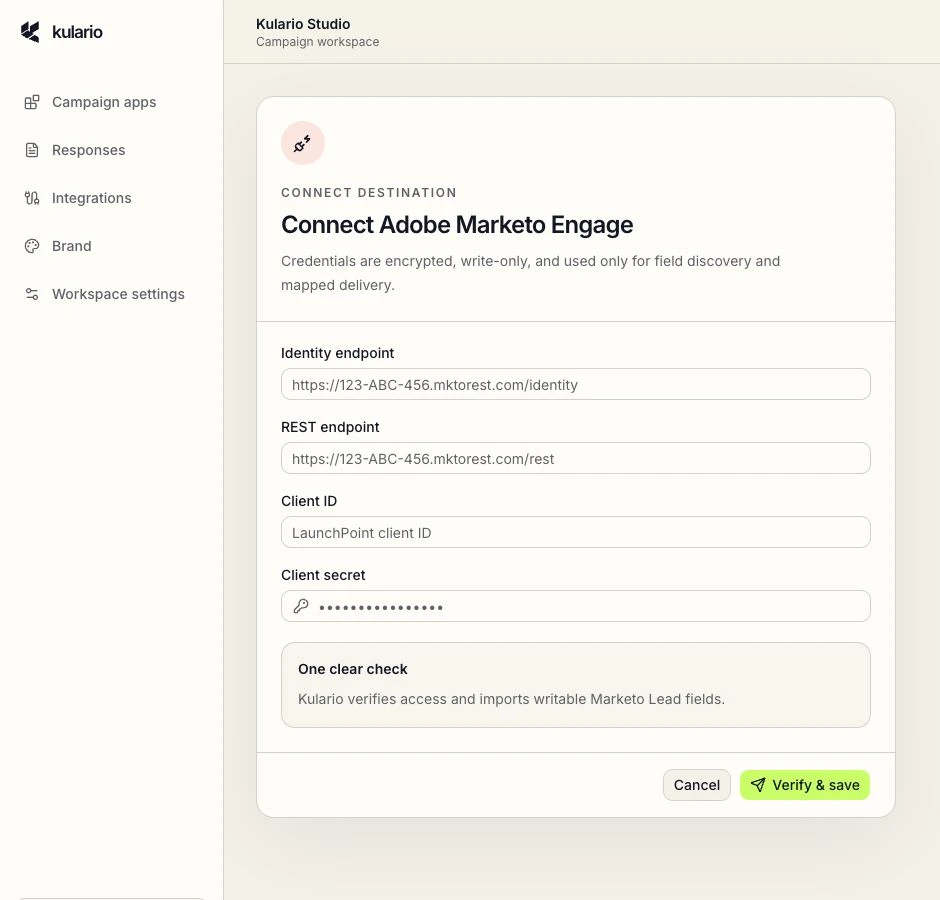
Connect and activate
- 1
Open Integrations from the Kulario workspace navigation.
- 2
Choose Connect Adobe Marketo Engage.
- 3
Paste the Identity endpoint and REST endpoint from Marketo Web Services.
- 4
Paste the LaunchPoint Client ID and Client Secret.
- 5
Choose Verify & save. Kulario verifies access and imports writable Lead fields.
- 6
Open the experience builder, then Capture & activate → Destinations, and select Primary Marketo.
- 7
Review Work email → email, add the result and answer fields you need, turn delivery on, and save.
Required mapping
- Work email → email
What happens after completion
Kulario uses Marketo's Sync Leads API with createOrUpdate and email as the lookup field. Only the fields saved in this experience's mapping are included.
Troubleshoot Adobe Marketo Engage
- Endpoint rejected
- Use the exact .mktorest.com/identity and .mktorest.com/rest URLs from Admin → Web Services. They must share a hostname.
- Credentials rejected
- Recheck the LaunchPoint Client ID, Client Secret, API-only user, and assigned role.
- A custom field is missing
- Create the field in Marketo, grant the API user access, then re-verify the Kulario connection.
Destination guide
HubSpot
Keep HubSpot Contact properties aligned with each buyer's result, priority, readiness, and declared context.
Destination
Contact
Identity
Delivery
Mapped fields only
Prepare the destination
- A HubSpot super admin creates a private app from Development → Legacy apps.
- Add crm.objects.contacts.write so Kulario can create and update Contacts.
- Add crm.schemas.contacts.read so Kulario can discover the writable Contact property catalog.
- Create every custom Contact property you expect to map. Kulario does not create properties in HubSpot.
- Create the private app and copy its access token.
Official provider guidance
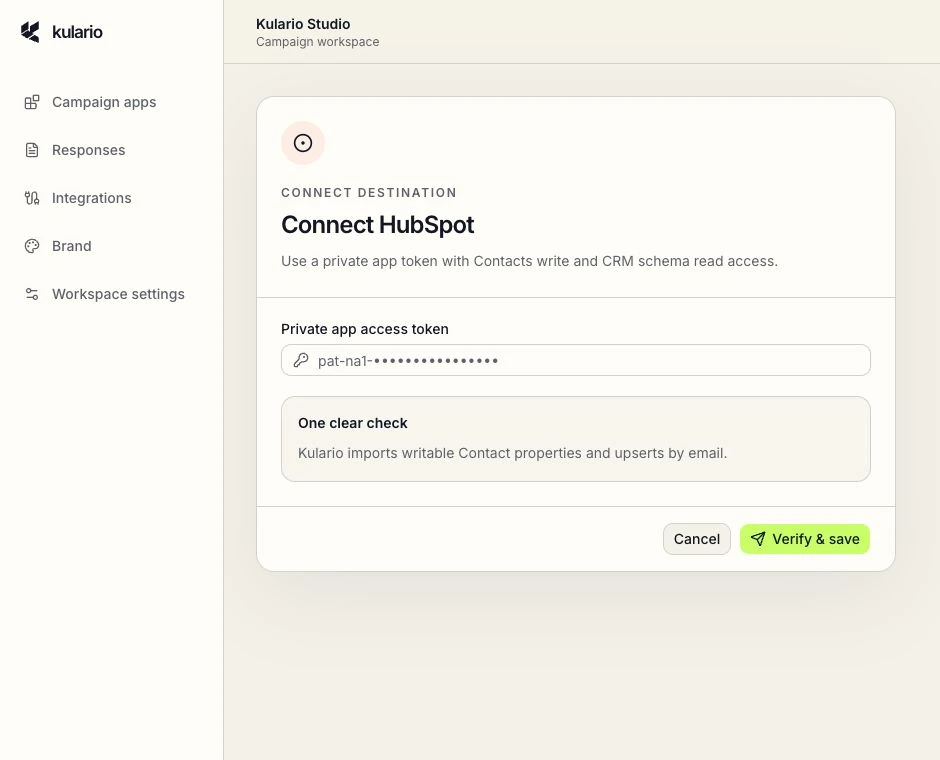
Connect and activate
- 1
Open Integrations in Kulario and choose Connect HubSpot.
- 2
Paste the complete Private app access token.
- 3
Choose Verify & save. Kulario reads the Contact schema and keeps only writable properties.
- 4
Open the experience builder, then Capture & activate → Destinations, and select Primary HubSpot.
- 5
Keep Work email → email and add the result, answer, or custom mappings this campaign needs.
- 6
Turn on Send completed responses and save the destination.
Required mapping
- Work email → email
What happens after completion
Kulario batch-upserts a HubSpot Contact using email as the unique identifier. Email is used for matching; every other selected value becomes a Contact property.
Troubleshoot HubSpot
- Properties cannot be loaded
- Confirm the private app includes crm.schemas.contacts.read and the token is current.
- Contacts cannot be written
- Add crm.objects.contacts.write to the private app, then re-verify the connection.
- Dropdown option warning
- The HubSpot property must contain matching active options. Add the options or map the Kulario value to a text property.
Destination guide
Salesforce
Route qualified buyer context into Salesforce Leads with explicit required-field and field-level permission checks.
Destination
Lead
Identity
Delivery
Mapped fields only
Prepare the destination
- Create a dedicated integration user and permission set with API Enabled.
- Grant Lead Read, Create, and Edit plus field access to Email, LastName, Company, and every mapped field.
- In Setup → App Manager, create a local External Client App and enable OAuth.
- Select Manage user data via APIs (api), enable Client Credentials flow, and save.
- In External Client Apps Manager, configure the dedicated integration user as the Run As user.
- Copy the Consumer Key, Consumer Secret, and the production My Domain URL.
Official provider guidance
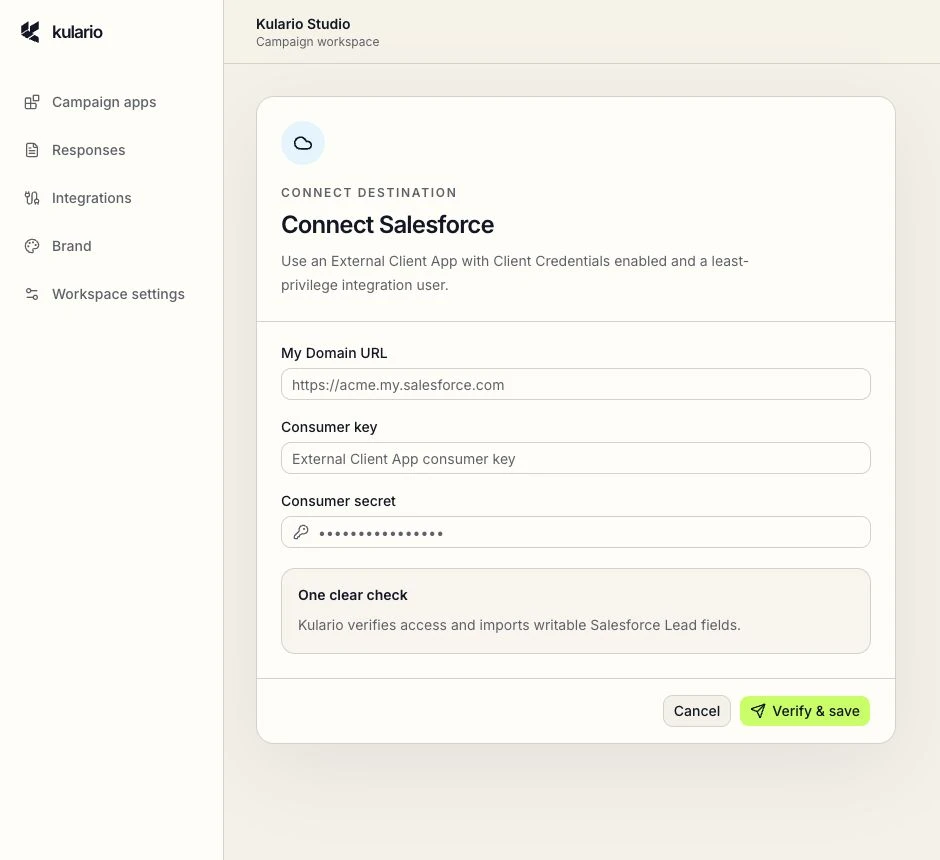
Connect and activate
- 1
Open Integrations in Kulario and choose Connect Salesforce.
- 2
Enter the production My Domain URL, Consumer Key, and Consumer Secret.
- 3
Choose Verify & save. Kulario authenticates and imports writable Lead fields.
- 4
In Capture & activate → Contact gate, collect and require Work email, Last name, and Company.
- 5
Open Capture & activate → Destinations and select Primary Salesforce.
- 6
Confirm the three required mappings and map any additional fields required by your Salesforce Lead schema.
- 7
Turn on Send completed responses and save the destination.
Required mapping
- Work email → Email
- Last name → LastName
- Company → Company
What happens after completion
Kulario searches Salesforce Leads by email. One match is updated, no match creates a Lead, and multiple matches stop delivery with an actionable ambiguity error.
Troubleshoot Salesforce
- Lead fields cannot be loaded
- Check API access, Lead object permissions, field-level security, the Run As user, and External Client App policy.
- Additional required-field warning
- Your Lead schema requires that field when creating a record. Map it from a Kulario field that is always collected and required.
- More than one Lead has this email
- Deduplicate or merge the Leads in Salesforce, then retry the failed delivery from the connection menu.
Destination guide
Signed webhooks
Send a verified context event to a data warehouse, automation platform, routing service, or any public HTTPS receiver.
Destination
JSON event
Identity
Event ID
Delivery
Mapped fields only
Prepare the destination
- Expose a public HTTPS endpoint that accepts JSON POST requests.
- Keep the exact raw request body available until after signature verification.
- Store the signing secret securely and compare signatures in constant time.
- Return a 2xx response only after accepting the event.
- Use Idempotency-Key or Kulario-Event-Id to deduplicate retries.
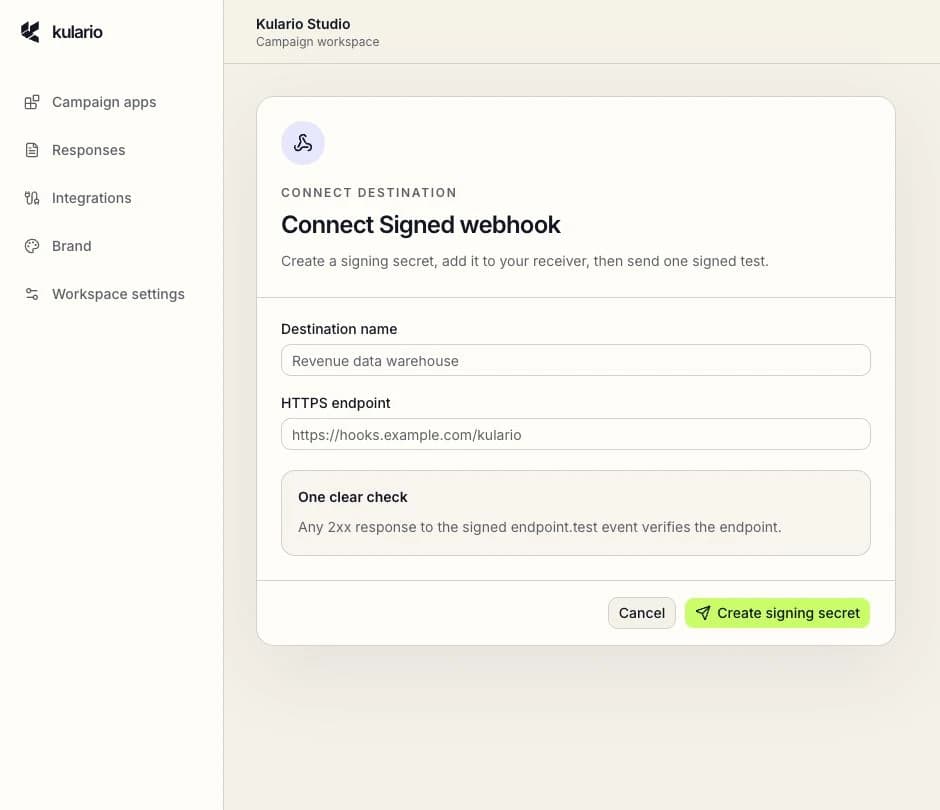
Connect and activate
- 1
Open Integrations in Kulario and choose Connect Signed webhook.
- 2
Enter a Destination name and public HTTPS endpoint.
- 3
Choose Create signing secret, copy the whsec_ value, and add it to the receiver.
- 4
Use the receiver verification example below or your own HMAC-SHA256 implementation.
- 5
Choose Send signed test & save. Any 2xx response to endpoint.test verifies the receiver.
- 6
In Capture & activate → Destinations, select the webhook and choose exactly which fields may leave Kulario.
- 7
Turn on Send completed responses and save the webhook.
Required mapping
- At least one available Kulario field
What happens after completion
Kulario sends an HMAC-SHA256 signed JSON envelope containing only the fields selected for that webhook. Stable event and idempotency IDs let receivers deduplicate retries.
Completion event
{
  "id": "delivery-id",
  "type": "submission.completed",
  "apiVersion": "2026-07-01",
  "createdAt": "2026-07-11T12:00:00.000Z",
  "data": {
    "submissionId": "submission-id",
    "resultUrl": "https://kulario.com/e/example/r/...",
    "fields": {
      "contact.email": "buyer@example.com",
      "result.overall-score": 72,
      "result.band": "Advancing"
    }
  }
}
Node signature verification
import { createHmac, timingSafeEqual } from "node:crypto";

export function verifyKulario(rawBody, header, secret) {
  const parts = Object.fromEntries(
    header.split(",").map((part) => part.split("="))
  );
  const timestamp = Number(parts.t);
  if (!Number.isSafeInteger(timestamp) ||
      Math.abs(Date.now() / 1000 - timestamp) > 300) return false;

  const key = Buffer.from(secret.slice("whsec_".length), "base64url");
  const expected = createHmac("sha256", key)
    .update(String(timestamp) + "." + rawBody, "utf8")
    .digest("hex");

  return /^[a-f0-9]{64}$/i.test(parts.v1 ?? "") &&
    timingSafeEqual(Buffer.from(parts.v1, "hex"), Buffer.from(expected, "hex"));
}
Troubleshoot Signed webhooks
- Endpoint rejected
- Use a publicly reachable HTTPS URL. Localhost, private-network destinations, and plain HTTP are rejected.
- Signature mismatch
- Verify the raw body before parsing JSON and sign timestamp.rawBody, not a reserialized object.
- Duplicate event
- Deduplicate using Idempotency-Key or Kulario-Event-Id. Kulario reuses both identifiers across retry attempts.
Experience activation
Map the context this campaign needs.
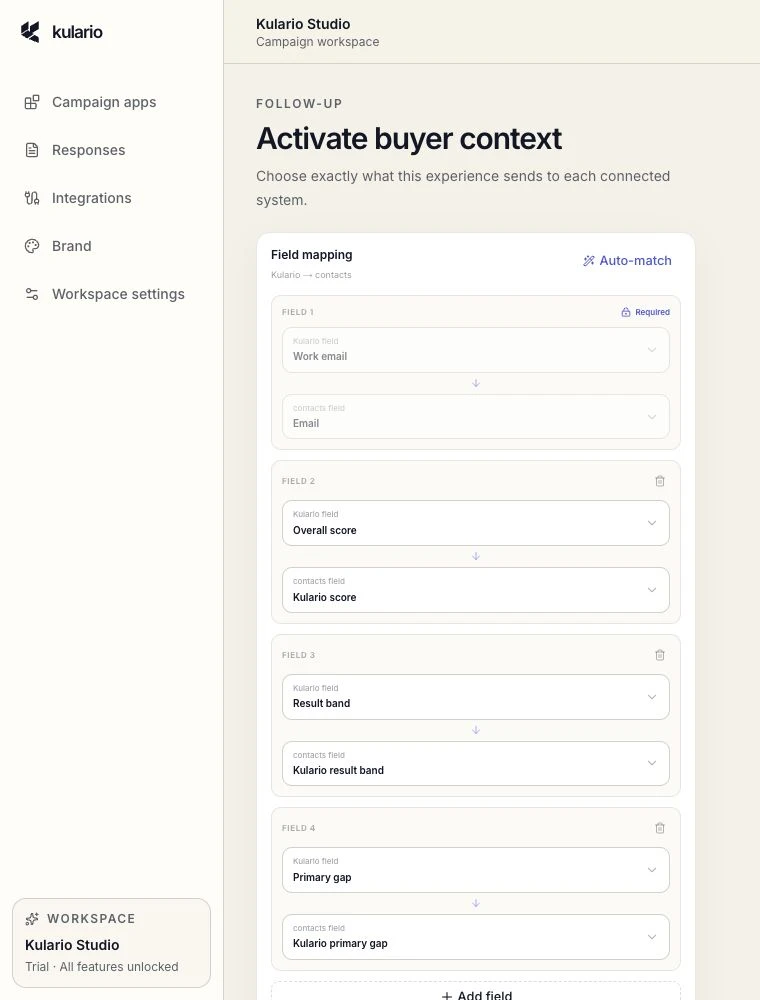
Kulario stores the complete submission. Each destination receives only the source fields that an editor explicitly pairs with writable external fields.
- 1
Open the experience builder and choose Capture & activate → Destinations.
- 2
Select a connected provider or signed webhook.
- 3
Choose Auto-match for CRM/MAP destinations or Suggest for a webhook.
- 4
Use the searchable Kulario and destination dropdowns to review every pair.
- 5
Add result, answer, and custom fields only when that downstream team will use them.
- 6
Turn on Send completed responses and save the destination.
Explicit by design
Unmapped fields remain in Kulario. An unanswered optional field is omitted instead of clearing an existing CRM value.
Fields available to map
| Group | Examples | Availability |
|---|---|---|
| Contact | First name, last name, work email, company, job title | When selected in the contact gate |
| Results | Overall score, band, primary gap, recommended play, result URL | Every completion |
| Answers | Every assessment, calculator, or maturity question | When the buyer provides a value |
| Custom | Text, email, number, dropdown, checkbox | Up to 12 per experience |
Control by design
Consent-gated, durable delivery.
The buyer's result is never held hostage by an external system. Kulario saves first, checks eligibility, then delivers asynchronously.
Explicit consent
A buyer can receive the result without agreeing to marketing. External delivery requires marketing consent.
Encrypted credentials
Provider credentials and webhook secrets are encrypted and remain write-only in the interface.
Durable retries
Retryable failures use an idempotent delivery record and exponential retries without duplicating the buyer event.
Complete receipt retained
The full response stays in Kulario even when no destination is connected or an external delivery is unavailable.
Saved
Eligibility
Mapped payload
Durable queue
External upsert
Common fixes
Resolve mapping and delivery issues.
Most activation problems come from missing permissions, a field that does not exist externally, or an identity field that is optional in the experience.
| What you see | What to do |
|---|---|
| Admin access required | Ask a workspace owner or admin to connect or manage credentials. |
| No destinations appear | Connect at least one provider from the workspace Integrations page. |
| Add marketing consent text | Open Capture & activate → Contact gate and complete Marketing consent. |
| Not collected in this experience | Enable the contact field or restore the deleted assessment question. |
| Destination field is missing | Create it externally, grant access, and re-verify the connection. |
| Types are incompatible | Map number to number/text, lists to multi-select/text, and text to text or a compatible enum. |
| Enum values are unmapped | Add matching active external options or choose a text field. |
| A test completion did not sync | Expected: test and Demo Lab traffic never delivers. Use a consented live completion. |